

Creating a Lightweight Personal Assistant Powered by a Qwen Language Model
Image by Editor | Midjourney
Introduction
The Qwen family of language models provides powerful and open-source large language models for various natural language processing tasks.
This article shows you how to set up and run a personal assistant application in Python powered by a Qwen model — specifically the Qwen1.5-7B-Chat model, which is an efficient and relatively lightweight 7-billion-parameter chat model optimized for conversational use cases. The code shown is ready to be used in a Python notebook such as Google Colab, but can easily be adapted to run locally if preferred.
Coding Solution
Since building a Qwen-powered assistant requires several dependencies and libraries being installed, we start by installing them and verifying installation versions to ensure compatibility among versions you might have pre-installed as much as possible.
|
pip install –q transformers accelerate bitsandbytes einops ipywidgets |
We also set GPU use, if available, to ensure a faster model inference, the first time it will be called during execution.
These initial setup steps are shown in the code below:
|
1 2 3 4 5 6 7 8 9 10 11 12 13 14 15 16 17 18 19 20 21 22 23 |
import torch from transformers import AutoModelForCausalLM, AutoTokenizer import time from IPython.display import display, HTML, clear_output import ipywidgets as widgets import sys import os
# Verifying installed packages and dependencies try: import bitsandbytes as bnb print(“Successfully imported bitsandbytes”) except ImportError: print(“Error importing bitsandbytes. Attempting to install again…”) !pip install –q bitsandbytes —upgrade import bitsandbytes as bnb
# Installing required packages (you may want to comment the cell below if you already got these installed) !pip install –q transformers accelerate bitsandbytes einops
# Set device, prioritizing GPU if available device = “cuda” if torch.cuda.is_available() else “cpu” print(f“Using device: {device}”) |
Now it’s time to load and configure the model:
- We use
Qwen/Qwen1.5-7B-Chat, which allows for faster first-time inference compared to heavier models like Qwen2.5-Omni, which is a real powerhouse but not as lightweight as other versions of this family of models. - As usual, when loading a pre-trained language model, we need a tokenizer that converts text inputs to a readable format by the model. Luckily, the
AutoTokenizer from HuggingFace's Transformers library smoothens this process. - To enhance efficiency, we try to configure 4-bit quantization which optimizes memory usage.
|
1 2 3 4 5 6 7 8 9 10 11 12 13 14 15 16 17 18 19 20 21 22 23 24 25 26 27 28 29 30 31 32 33 34 35 36 37 38 39 40 41 42 |
# Load Qwen1.5-7B-Chat model – publicly available and efficient to run in Google Colab with T4 GPU model_name = “Qwen/Qwen1.5-7B-Chat”
print(f“Loading {model_name}…”) start_time = time.time()
# Loading the tokenizer tokenizer = AutoTokenizer.from_pretrained(model_name, trust_remote_code=True)
# Trying to load the model with 4-bit quantization for efficiency try: print(“Attempting to load model with 4-bit quantization…”) model = AutoModelForCausalLM.from_pretrained( model_name, torch_dtype=torch.bfloat16, # Use bfloat16 for better performance device_map=“auto”, trust_remote_code=True, quantization_config={“load_in_4bit”: True} # 4-bit quantization for memory efficiency ) except Exception as e: print(f“4-bit quantization failed with error: {str(e)}”) print(“Falling back to 8-bit quantization…”) try: model = AutoModelForCausalLM.from_pretrained( model_name, torch_dtype=torch.bfloat16, device_map=“auto”, trust_remote_code=True, load_in_8bit=True # Try 8-bit quantization instead ) except Exception as e2: print(f“8-bit quantization failed with error: {str(e2)}”) print(“Falling back to standard loading (will use more memory)…”) model = AutoModelForCausalLM.from_pretrained( model_name, torch_dtype=torch.bfloat16, device_map=“auto”, trust_remote_code=True )
load_time = time.time() – start_time print(f“Model loaded in {load_time:.2f} seconds”) |
When building our own conversational assistant, it is typically a good practice to craft a default prompt that accompanies each specific request to adapt the model’s behavior and generated response to our needs. Here’s a specific default prompt:
system_prompt = """You are a helpful, respectful and honest assistant. Always answer as helpfully as possible, while being safe. Your answers should be engaging and fun.
If a question does not make any sense, or is not factually coherent, explain why instead of answering something not correct. If you don't know the answer to a question, please don't share false information."""
The following function we will define encapsulates the heaviest part of the execution flow, as this is where the model gets user input and is called to perform inference and generate a response. Importantly, we will run a conversation in which we can sequentially make multiple requests, therefore, it is important to manage the chat history accordingly and incorporate it as part of each new request.
|
1 2 3 4 5 6 7 8 9 10 11 12 13 14 15 16 17 18 19 20 21 22 23 24 25 26 27 28 29 30 31 32 33 34 35 36 37 38 39 40 |
def generate_response(user_input, chat_history=None): if chat_history is None: chat_history = []
# Formatting the conversation for the model messages = [{“role”: “system”, “content”: system_prompt}]
# Adding chat history for a full context of the conversation for message in chat_history: messages.append(message)
# Adding the current user input messages.append({“role”: “user”, “content”: user_input})
# Tokenization: converting messages to model input format prompt = tokenizer.apply_chat_template(messages, tokenize=False, add_generation_prompt=True) inputs = tokenizer(prompt, return_tensors=“pt”).to(device)
# Generating response: this part may take some time to execute at first with torch.no_grad(): outputs = model.generate( **inputs, max_new_tokens=512, do_sample=True, temperature=0.7, top_p=0.9, pad_token_id=tokenizer.pad_token_id or tokenizer.eos_token_id )
# Decoding the generated response full_response = tokenizer.decode(outputs[0], skip_special_tokens=True)
# Extracting only the assistant’s response, instead of the full raw output assistant_response = full_response.split(user_input)[–1].strip()
# Further cleaning up the response if it contains role markers or other artifacts if “assistant” in assistant_response.lower()[:20]: assistant_response = assistant_response.split(“:”, 1)[–1].strip()
return assistant_response |
Once the key function to generate responses has been defined, we can build a simple user interface to run and interact with the assistant.
The interface will contain an output display area that shows the conversation, an input text box where the user can ask questions, and two buttons for sending a request and clearing the chat. Notice the use of the widgets library for these elements.
|
1 2 3 4 5 6 7 8 9 10 11 12 13 14 15 16 17 18 19 20 21 22 23 24 25 26 27 28 29 30 31 32 33 34 35 36 37 38 39 40 41 42 43 44 45 46 47 48 49 50 51 52 53 54 55 56 57 58 59 60 61 62 63 64 65 66 67 68 69 70 71 72 |
# Create a simple UI for the personal assistant def create_assistant_ui(): output = widgets.Output() input_box = widgets.Text( value=”, placeholder=‘Ask me anything…’, description=‘Question:’, layout=widgets.Layout(width=‘80%’) ) send_button = widgets.Button(description=“Send”) clear_button = widgets.Button(description=“Clear Chat”)
chat_history = []
def on_send_button_clicked(b): user_input = input_box.value if not user_input.strip(): return
with output: print(f“You: {user_input}”)
# Show thinking indicator print(“Assistant: Thinking…”, end=“\r”)
# Generate response start_time = time.time() try: response = generate_response(user_input, chat_history) end_time = time.time()
# Clear the “thinking” message clear_output(wait=True)
# Display the exchange print(f“You: {user_input}”) print(f“Assistant: {response}”) print(f“\n(Response generated in {end_time – start_time:.2f} seconds)”)
# Update chat history chat_history.append({“role”: “user”, “content”: user_input}) chat_history.append({“role”: “assistant”, “content”: response}) except Exception as e: clear_output(wait=True) print(f“You: {user_input}”) print(f“Error generating response: {str(e)}”) import traceback traceback.print_exc()
# Clear input box input_box.value = ”
def on_clear_button_clicked(b): with output: clear_output() print(“Chat cleared!”) chat_history.clear()
# Connect button clicks to functions send_button.on_click(on_send_button_clicked) clear_button.on_click(on_clear_button_clicked)
# Handle Enter key in input box def on_enter(sender): on_send_button_clicked(None) input_box.on_submit(on_enter)
# Arrange UI components input_row = widgets.HBox([input_box, send_button, clear_button]) ui = widgets.VBox([output, input_row])
return ui |
Alternatively, we can also set up the option of using a command line interface (CLI) for the chat workflow:
|
1 2 3 4 5 6 7 8 9 10 11 12 13 14 15 16 17 18 19 20 21 22 23 24 25 26 27 |
# Example of a simpler approach to utilize the model (command line interface) def cli_chat(): print(“\n=== Starting CLI Chat (type ‘exit’ to quit) ===”) chat_history = []
while True: user_input = input(“\nYou: “) if user_input.lower() in [‘exit’, ‘quit’, ‘q’]: print(“Goodbye!”) break
print(“Assistant: “, end=“”) try: start_time = time.time() response = generate_response(user_input, chat_history) end_time = time.time()
print(f“{response}”) print(f“(Generated in {end_time – start_time:.2f} seconds)”)
# Update chat history chat_history.append({“role”: “user”, “content”: user_input}) chat_history.append({“role”: “assistant”, “content”: response}) except Exception as e: print(f“Error: {str(e)}”) import traceback traceback.print_exc() |
Almost done. We will define two last functions:
- One for performing a quick test to ensure that both the model and dependencies are set up well.
- An overarching function to run the entire conversational assistant application. Here, the user can choose the kind of interface to use (UI vs. CLI).
|
1 2 3 4 5 6 7 8 9 10 11 12 13 14 15 16 17 18 19 20 21 22 23 24 25 26 27 28 29 30 31 32 33 34 35 36 37 38 39 40 41 42 43 44 45 46 47 48 |
# Trying a simple test query to ensure everything is working def quick_test(): test_question = “What can you help me with?” print(f“\nTest Question: {test_question}”)
start_time = time.time() try: response = generate_response(test_question) end_time = time.time()
print(f“Response: {response}”) print(f“Generation time: {end_time – start_time:.2f} seconds”) return True except Exception as e: print(f“Test failed with error: {str(e)}”) import traceback traceback.print_exc() # Print the full stack trace for debugging return False
# Overarching function for our application: we can choose here which interface to use def run_assistant(): print(“\nRunning quick test…”) test_success = quick_test()
if test_success: # Ask user which interface they prefer interface_choice = input(“\nChoose interface (1 for UI, 2 for CLI): “)
if interface_choice == “2”: cli_chat() else: print(“\nStarting the personal assistant UI…”) assistant_ui = create_assistant_ui() display(assistant_ui)
# Usage instructions print(“\n— Instructions —“) print(“1. Type your question in the text box”) print(“2. Press Enter or click ‘Send'”) print(“3. Wait for the assistant’s response”) print(“4. Click ‘Clear Chat’ to start a new conversation”) print(“———————-“) else: print(“\nSkipping UI launch due to test failure.”) print(“You may want to try the CLI interface by calling cli_chat() directly”)
# Running the conversational assistant run_assistant() |
Trying It Out
If everything has gone well, now it’s time to have fun and interact with our newly built assistant. Here is an example excerpt of the conversational workflow.
Running quick test...
Test Question: What can you help me with?
Response: 1. General knowledge: I can provide information on a wide range of topics, from history and science to pop culture, current events, and more.
2. Problem-solving: Need help with a math problem, figuring out how to do something, or troubleshooting an issue? I'm here to guide you.
3. Research: If you have a specific topic or question in mind, I can help you find reliable sources and summarize the information for you.
4. Language assistance: Need help with writing, grammar, spelling, or translation? I can assist with that.
5. Fun facts and trivia: Want to impress your friends with interesting facts or just looking for a good laugh? I've got you covered!
6. Time management and organization: Strategies to help you stay on top of your tasks and projects.
7. Personal development: Tips for learning new skills, setting goals, or managing your emotions.
Just let me know what you need, and I'll do my best to assist you! Remember, I can't always give away all the answers, but I'll certainly try to make the process as enjoyable and informative as possible.
Generation time: 18.04 seconds
Choose interface (1 for UI, 2 for CLI):
Below is an example of live interaction through the UI.
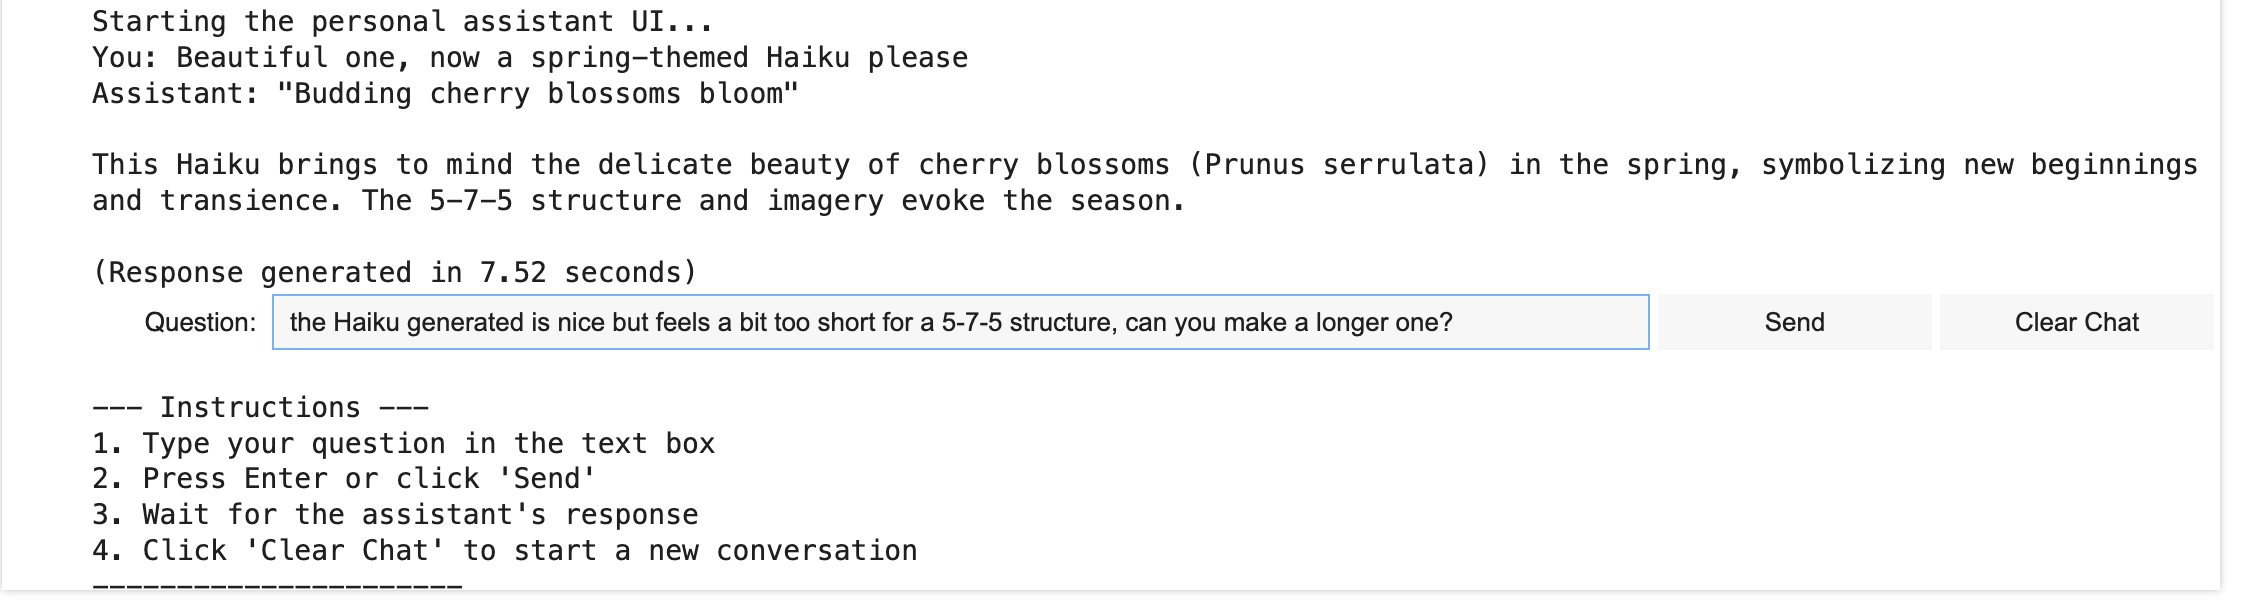
Qwen-based conversational assistant’s UI
Image by Author
Conclusion
In this article, we demonstrated how to build a simple conversational assistant application powered by a lightweight yet powerful Qwen language model. This application is designed to be run and tried out efficiently in a GPU setting like those offered by Google Colab notebook environments.